


To change an SSL certificate in IIS Manager, you need to first install the new certificate and then update the site bindings to use it.

Step 1: Install the new certificate on the server
- Open Internet Information Services (IIS) Manager (press
Windows Key + R, typeinetmgr, and pressEnter). - In the Connections panel on the left, click on the server name.
- In the central panel, double-click Server Certificates under the “IIS” section.
- In the Actions panel on the right, click on Complete Certificate Request if you generated a Certificate Signing Request (CSR) on this server, or click Import if you have a
.pfxfile.- For “Complete Certificate Request”: Locate the
.crtor.cerfile you received from the Certificate Authority (you may need to select*.*in the file browser to find the file). Provide a unique “Friendly name” and select the “Personal” certificate store. - For “Import”: Provide the path to your
.pfxfile and its password, then click OK.
- For “Complete Certificate Request”: Locate the
- The new certificate should now appear in the list of Server Certificates.
Step 2: Update the website binding
- In the Connections panel, expand the Sites folder and select the specific website you want to update (e.g.,
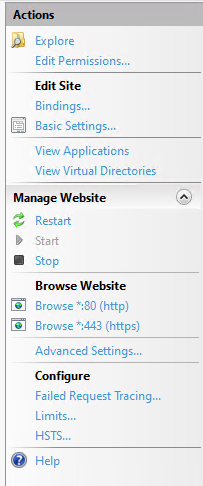
Default Web Site). - In the Actions panel on the right, under “Edit Site”, click Bindings….
- In the Site Bindings dialog box, select the existing
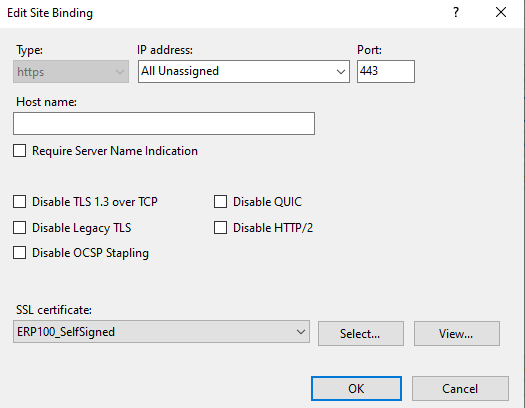
httpsbinding and click Edit (or click Add if no https binding exists). - In the “Edit Site Binding” (or “Add Site Binding”) dialog box:
- Ensure the Type is set to
https. - Confirm the IP address is correct (usually
All Unassigned). - Ensure the Port is
443(the default for HTTPS). - From the SSL certificate drop-down list, select the new certificate you just installed (using the “Friendly name” you assigned).
- (Optional) If using Server Name Indication (SNI) for multiple certificates on one IP address/port combination, ensure Require Server Name Indication is checked.
- Ensure the Type is set to
- Click OK to save the changes, then click Close on the Site Bindings window.
Step 3: Restart the website
- In the Actions panel on the right, under “Manage Website”, click Restart. This will ensure the new certificate is used for all subsequent secure connections.
- Test the website in a web browser to confirm the new SSL certificate is working correctly.

Leave a Reply
You must be logged in to post a comment.